Blurit On-Premise Documentation
1.0.0
1.0.0
  • Blurit On-Premise
    • 🚀Getting started
    • 💻Requirements
    • 🖊️Installation
      • Linux dependencies
      • Windows dependencies (WSL)
      • Configuration
      • Run BlurIt OP
      • Multi-servers installation
      • Post installation verifications
    • 🎇Usage
      • Manager Webapp
      • API
        • License
        • Tasks
          • Process a directory
          • Process a file
          • Get the status of a task
    • Version notes
Powered by GitBook
On this page
  • Extract the BlurIt OP archive(windows only)
  • Nvidia Driver installation
  • Install WSL 2 (Windows Subsystem Linux)
  • Docker installation
  • Docker-compose
  • Nvidia-docker installation
  • Configuring Docker daemon
  1. Blurit On-Premise
  2. Installation

Windows dependencies (WSL)

PreviousLinux dependenciesNextConfiguration

Don't follow this step if you plan to run BlurIt OP on Linux. instead.

Extract the BlurIt OP archive(windows only)

Extract the BlurIt OP archive with your favorite tools. In WSL you can use the same command as for Linux:

tar -xzf filename.tar.gz
cd blurit-op

Otherwise, just use your favorite tool to extract the archive.

Nvidia Driver installation

Download the NVIDIA driver >= 470 exe from:

You can also update the drivers using .

Install WSL 2 (Windows Subsystem Linux)

To Check if WSL is installed, open PowerShell as administrator and run:

wsl -l –v

If WSL is not installed:

wsl --install -d Ubuntu

Then reboot your machine.

Docker installation

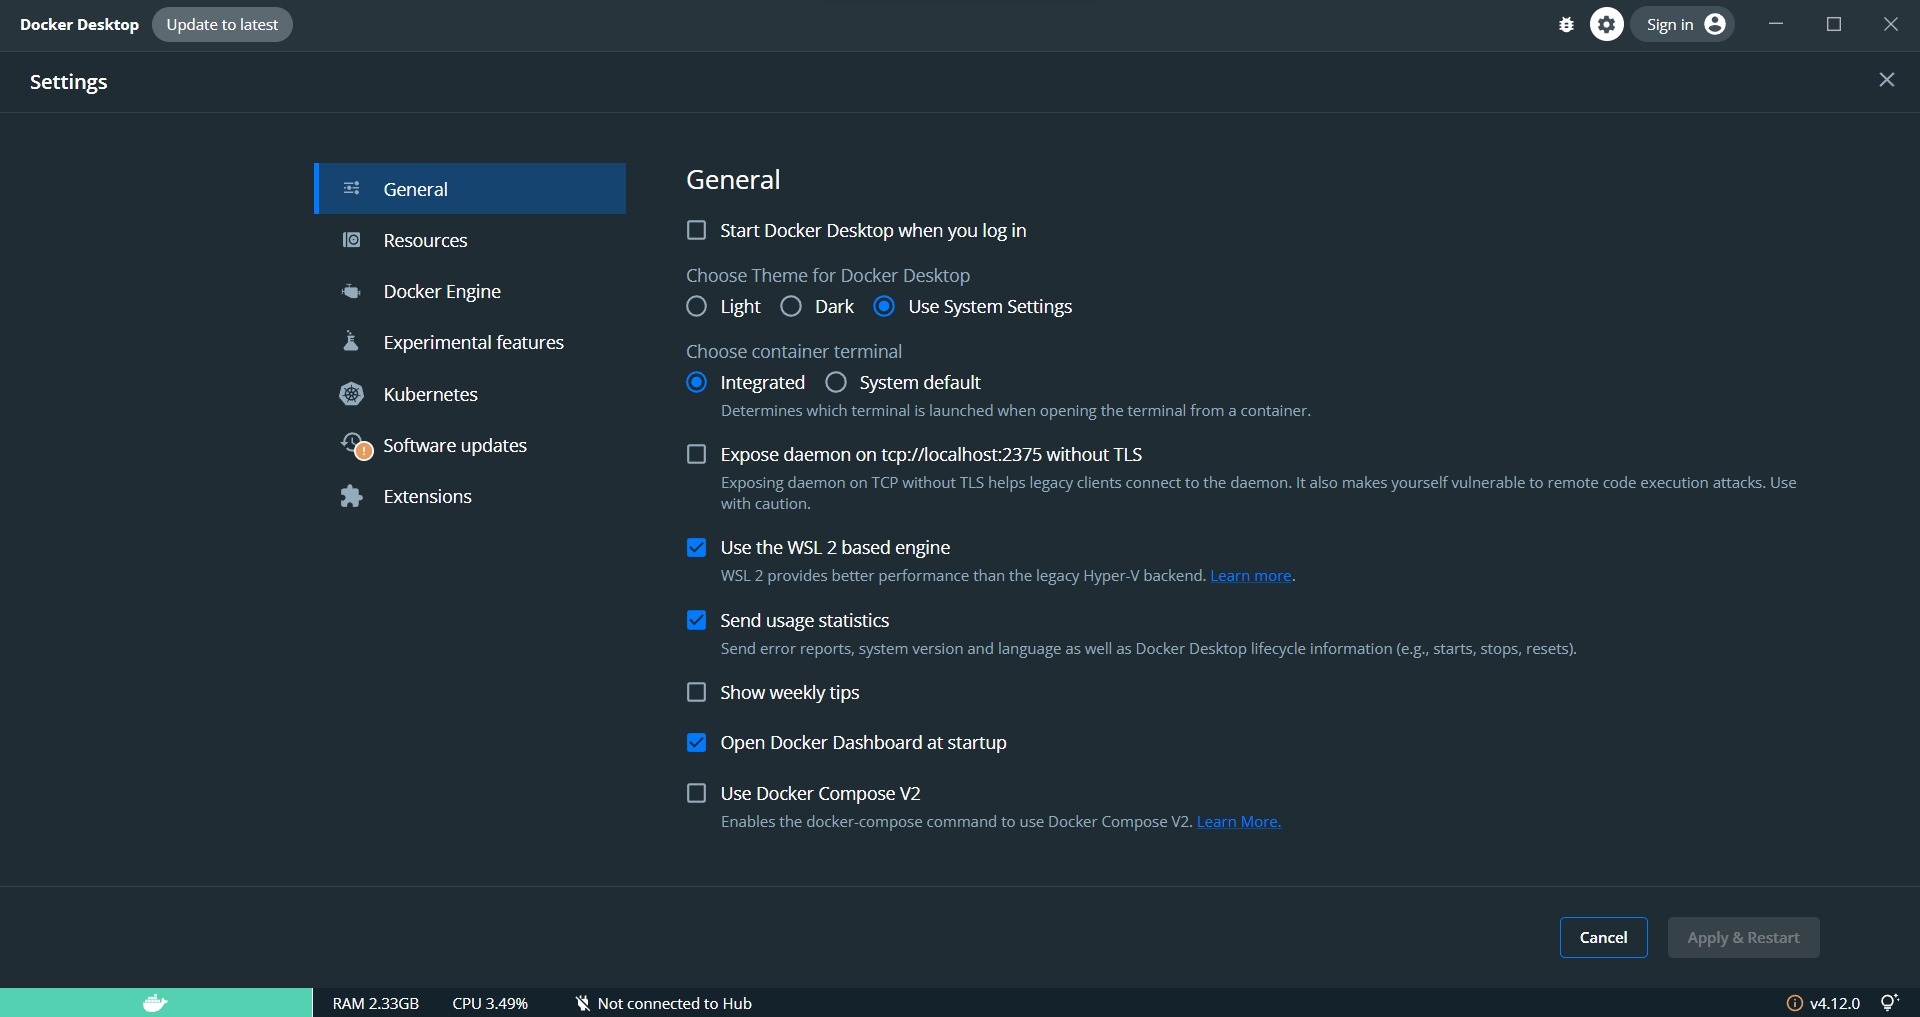
During the install don't forget to tick the Use WSL 2 instead of Hyper-V checkbox.
Docker-compose

Docker-compose version must be <= 1.29.

To enter WSL, open PowerShell and type wsl followed by pressing Enter.

wget https://github.com/docker/compose/releases/download/1.29.2/docker-compose-Linux-x86_64
chmod +x docker-compose-Linux-x86_64
mv docker-compose-Linux-x86_64 /usr/bin/docker-compose

Nvidia-docker installation

To enter WSL, open PowerShell and type wsl followed by pressing Enter.

distribution=$(. /etc/os-release;echo $ID$VERSION_ID) \
      && curl -fsSL https://nvidia.github.io/libnvidia-container/gpgkey | sudo gpg --dearmor -o /usr/share/keyrings/nvidia-container-toolkit-keyring.gpg \
      && curl -s -L https://nvidia.github.io/libnvidia-container/$distribution/libnvidia-container.list | \
            sed 's#deb https://#deb [signed-by=/usr/share/keyrings/nvidia-container-toolkit-keyring.gpg] https://#g' | \
            sudo tee /etc/apt/sources.list.d/nvidia-container-toolkit.list

sudo apt-get update
sudo apt-get install -y nvidia-container-toolkit

sudo nvidia-ctk runtime configure --runtime=docker

Restart Docker:

sudo systemctl restart docker

Verify that Nvidia-Docker is installed:

sudo docker run --rm --runtime=nvidia --gpus all nvidia/cuda:11.6.2-base-ubuntu20.04 nvidia-smi -a

Look for the GPU UUID and copy the two first parts of the UID. For instance, for GPU-45cbf7b3-f919-7228-7a26-b06628ebefa1 copy GPU-45cbf7b3.

Configuring Docker daemon

Append the following JSON content on the Docker Desktop config like this:

{
	... # current content
	"runtimes": {
		"nvidia": {
			"path": "/usr/bin/nvidia-container-runtime",
			"runtimeArgs": []
		}
	},
	"default-runtime": "nvidia",
	"node-generic-resources": [
	    "NVIDIA-GPU=GPU-xxxxxxxx"
	]
}

Restart Docker for the change to take effect.

sudo systemctl restart docker

Instruction to install docker CE on windows with WSL 2 backend : .

Replace xxxxxxxx with the UUID you noted at .

🖊️
Go there
https://www.nvidia.com/Download/index.aspx?lang=en-us
Nvidia Geforce Experience
https://docs.docker.com/desktop/install/windows-install/
Configuration
nvidia-docker section